
Chat Example Using Proto.Remote
In this example, we are going to go beyond Proto.Actor and leverage Proto.Remote package in order to enable bidirectional communication between different actors in a client to server fashion.
These actors might be living inside of separate actor systems partitioned by a network (potentially located on different machines) and as a result of this, we are actually going to demonstrate how easy it is to create a basic but functional distributed system of actors by using just a couple of Proto features.
Proto.Remote
Communication between actors living in the same actor system is a pretty straightforward and reliable task for Proto.Actor alone to accomplish but bringing the network into play is a whole different ball game.
As soon as we connect two machines together via the network we delve into the world of distributed systems that are prone to all kinds of issues that simply don’t exist when we are operating in the comfort of a single monolithic application.
To learn more about this, you can read about the fallacies of distributed computing here.
What Proto.Remote does for us is that it abstracts many of these issues away from us (such as serialization and communication over the network) and lets us concentrate on the important thing, which is our application and our problem domain. It offers what is called location transparency that enables us to treat communication between actors on different machines the same as communication between actors in the local system by using nothing more than simple process PIDs.
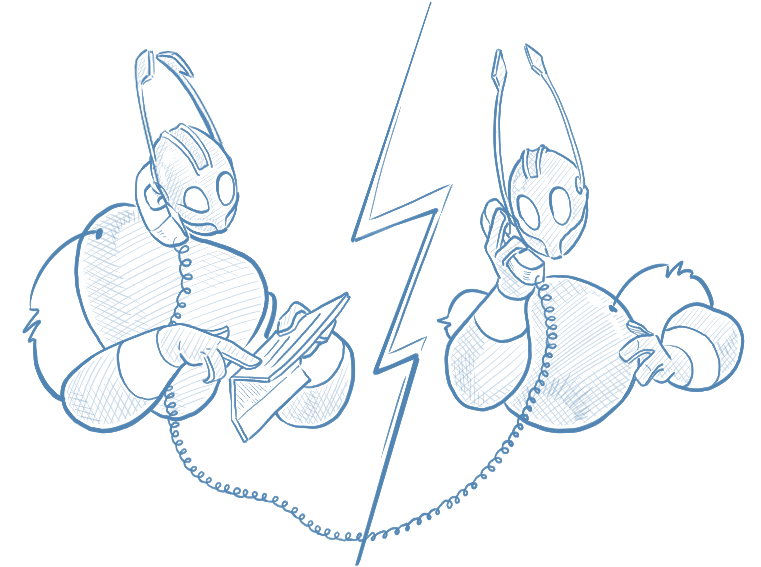
If your mind is a bit twisted by now, check out the sketch below:
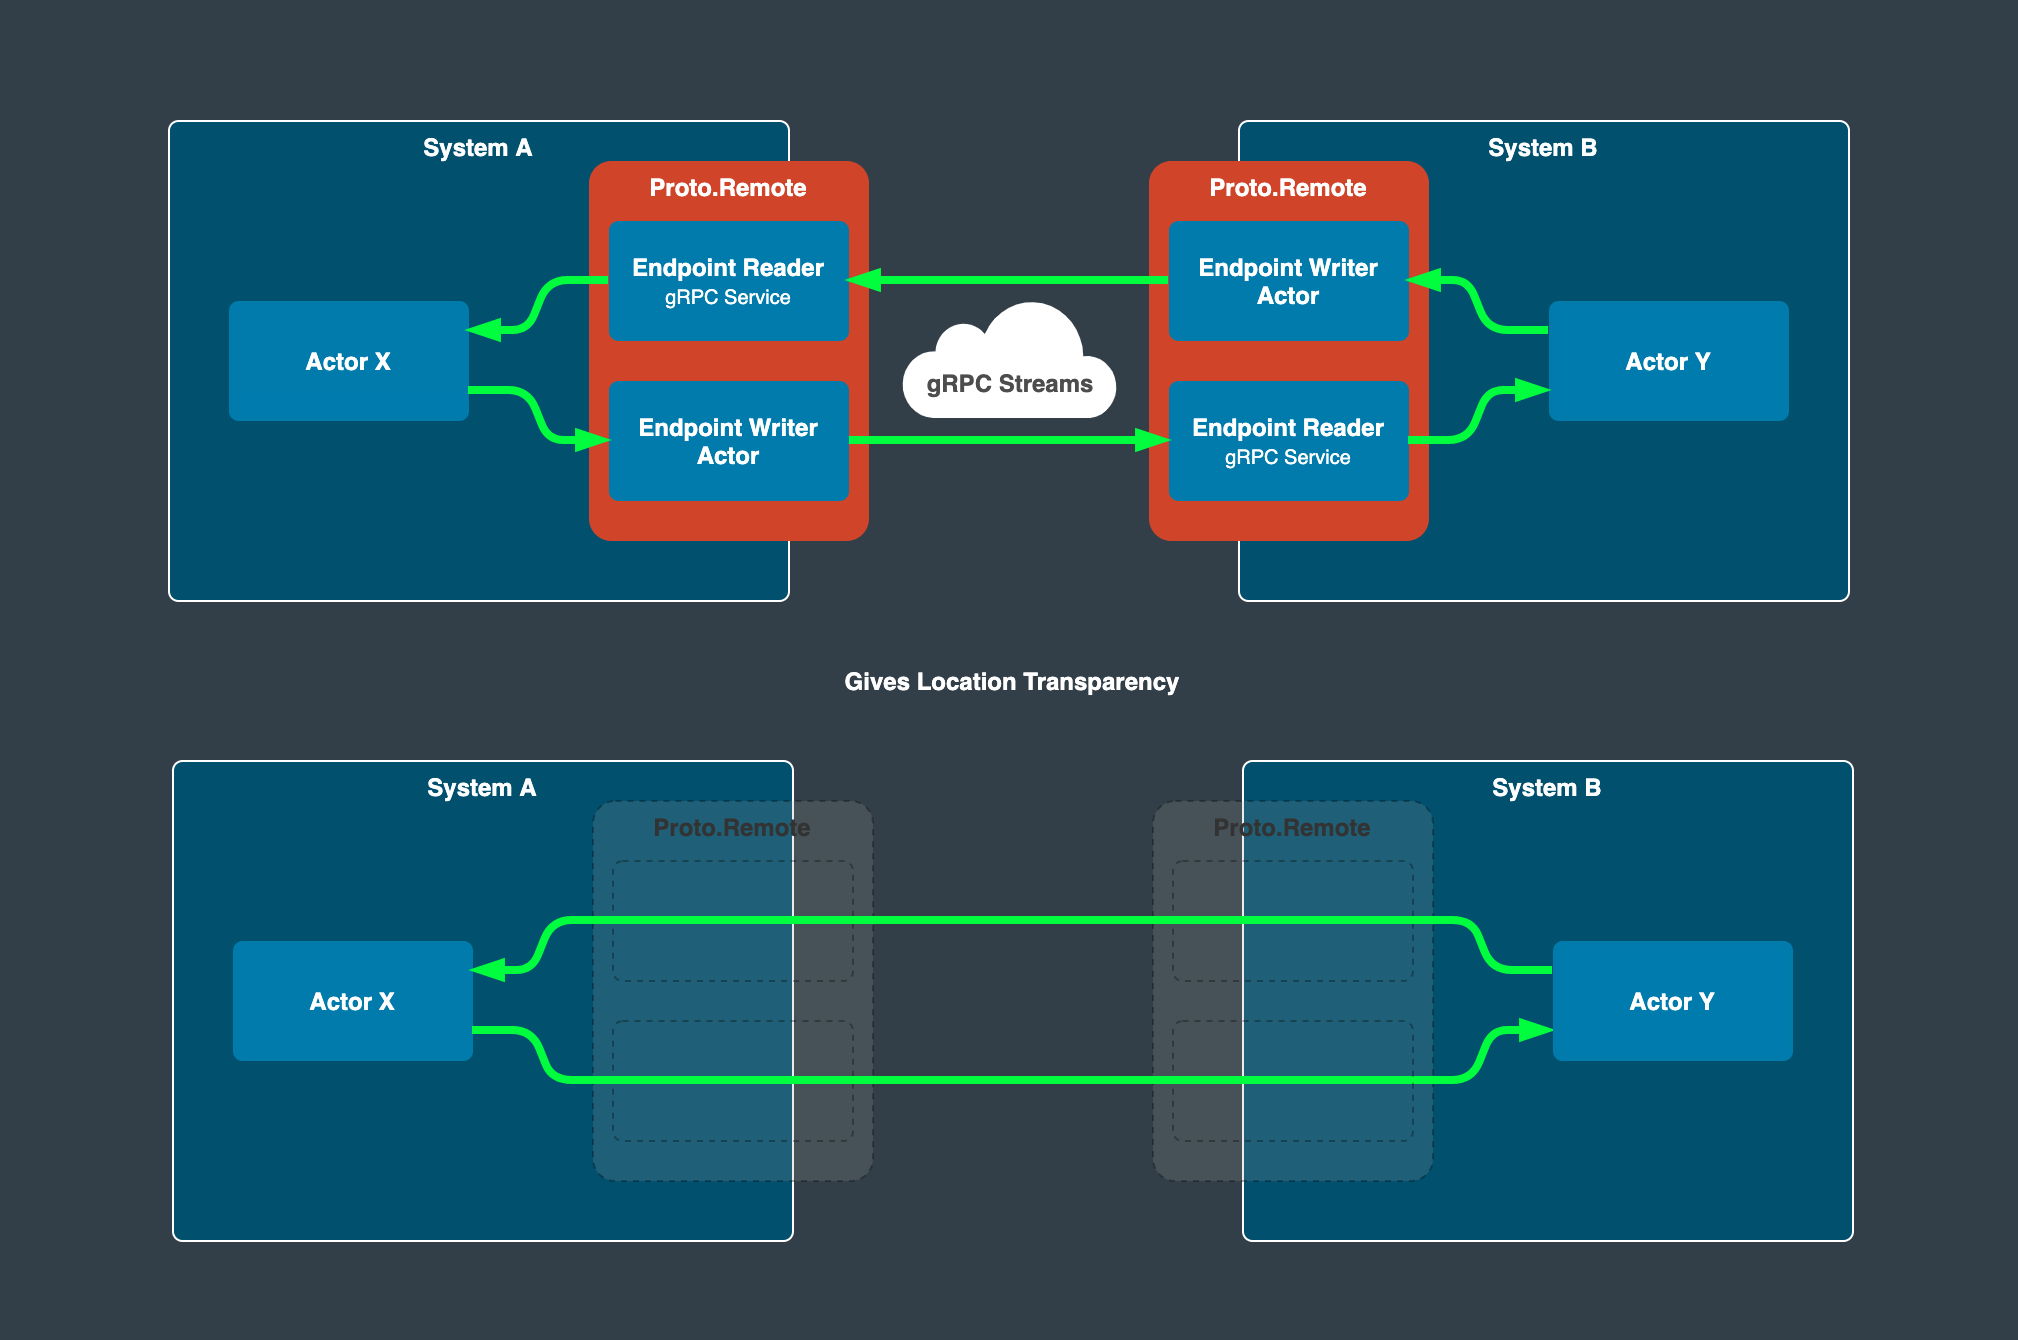
As stated by the founder of Proto.Actor Roger Johansson:
Proto.Remotemanages all the complexity of connections and message serialization, making it so that client actor and server actor believe they are talking directly to each other.
gRPC
The way Proto.Remote accomplishes this is by using gRPC as an underlying transport that like we already mentioned deals with the messy networking details of service to service communication. Without going further into details it suffices to say that it leverages HTTP2 protocol streaming capability that in turn enables bidirectional streaming between clients and servers.
Another very powerful aspect of gRPC is that it enables us to combine clients and servers (different actor systems) written using different programming languages. So for example you might have one actor system written in Go and another using C# and they would seamlessly communicate with each other.
You can read more about gRPC
here.
Protocol Buffers
The main ingredient of gRPC are
Protocol Buffers aka Protobuf.
Protobuf is an interface definition language that enables us to define contracts between services (messages and endpoints) in a language natural fashion.
We can then take these contracts and use gRPC in order to generate clients and servers in different languages and take care of all of the underlying transport mechanism and serialization/deserialization of those messages.
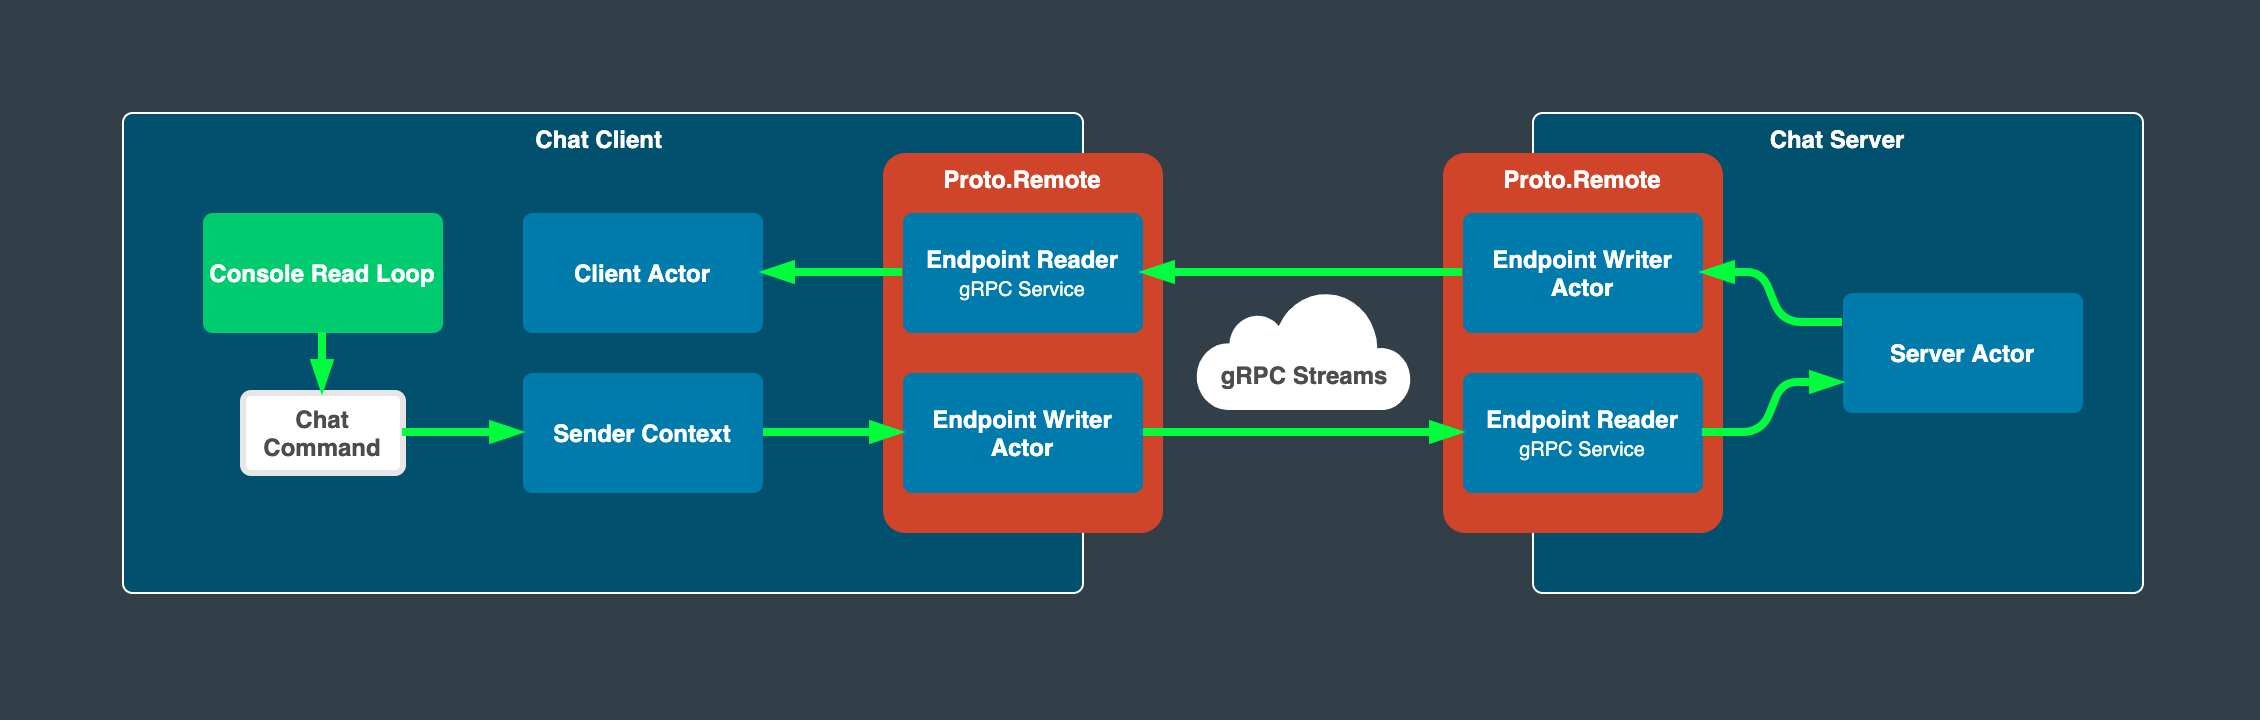
High-Level Overview of Our Chat Example
You can find the example on github here.

Proto.Remote library.
Since client and server parts of our example are in a client/server relationship (duh), each client actor will initiate a connection request towards the server by using its PID and in fact use the server as a kind of service.
The server in turn will keep track of all client PIDs and use them in order to be able to broadcast incoming messages in a fan-out fashion to all known clients (including the sender).
Protobuf Chat Messages
So, now that we know how gRPC and Protobuf enable us to communicate between different actor systems, the first thing we need to do is to define our contracts (actor messages) using protobuf IDL.
syntax = "proto3";
package messages;
option csharp_namespace = "chat.messages";

import "Proto.Actor/Protos.proto";

message Connect
{
	actor.PID Sender = 1;
}

message Connected {
    string Message = 1;
}

message SayRequest {
    string UserName = 1;
    string Message = 2;
}

message SayResponse {
    string UserName = 1;
    string Message = 2;
}

message NickRequest {
    string OldUserName = 1;
    string NewUserName = 2;
}

message NickResponse {
    string OldUserName = 1;
    string NewUserName = 2;
}
As you see, the language itself is pretty straight forward but in order to fully understand it, you can read more about it here.
For now, it is enough to say that based on these protobuf definitions, libraries containing message classes will be autogenerated in our respective languages (in this case C#) which we can then use reference from our client and server implementations.
Server
You can find the complete server example here.
In the next couple of sections, we are going to dissect it piece by piece.
Creating an Actor System
First we need to intialize and start our actor system and remote which is acomplished by following lines of code located in InitializeActorSystem method in the server assembly.
var config =
    BindToLocalhost(8000)
        .WithProtoMessages(ChatReflection.Descriptor);

var system
    = new ActorSystem()
        .WithRemote(config);

system
    .Remote()
    .StartAsync();

context = system.Root;
BindToLocalhost method from Proto.Remote.GrpcCore.GrpcCoreRemoteConfig static class which creates Proto.Remote configuration that binds to localhost address on port 8000 and chaining WithProtoMessages we tell the config factory where to find the fore mentioned auto-generated messages from our protobuf definition which are in this case located in chat.messages namespace.
Next, we simply start the system and make a note of the root context for later usage.
After this, the server will be ready to accept connections on localhost:8000 and enable us to receive messages from remote actor systems.
Easy as that.
Overview of Server Actor
var clients = new HashSet<PID>();

context.SpawnNamed(
    Props.FromFunc(
        ctx => {
            switch (ctx.Message)
            {
                case Connect connect:
                    Console.WriteLine($"Client {connect.Sender} connected");

                    clients.Add(connect.Sender);

                    ctx.Send(
                        connect.Sender,
                        new Connected
                        {
                            Message = "Welcome!"
                        }
                    );
                    break;
                case SayRequest sayRequest:
                    foreach (var client in clients)
                    {
                        ctx.Send(
                            client,
                            new SayResponse
                            {
                                UserName = sayRequest.UserName,
                                Message = sayRequest.Message
                            }
                        );
                    }

                    break;
                case NickRequest nickRequest:
                    foreach (var client in clients)
                    {
                        ctx.Send(
                            client,
                            new NickResponse
                            {
                                OldUserName = nickRequest.OldUserName,
                                NewUserName = nickRequest.NewUserName
                            }
                        );
                    }

                    break;
            }

            return Task.CompletedTask;
        }
    ),
    "chatserver"
);
Props.FromFunc method. We are going to spawn the actor in the root context (the top-level actor system).
The actor func takes closure over the clients hash set which is used to keep track of all connected clients.
Each time a connection request is received via Connected message, the incoming client PID is added to the set and a response message is sent back to the sender.
When a SayRequest message is received, the response is broadcasted back to all clients via SayResponse message. A similar thing happens with NickRequest message which is used to change the nick of the user and is then also sent back to all clients in the same fan-out fashion.
Client
Proto.Remote and its underlying gRPC implementation.
You can find the complete client example here where you can see that the client side is a tad bit more involved, but nothing too fancy. Let’s go over the important parts piece by piece.
Creating an Actor System
Same as before, we will intialize and start our actor system and remote.
var config =
    BindToLocalhost()
        .WithProtoMessages(ChatReflection.Descriptor);

var system =
    new ActorSystem()
        .WithRemote(config);

system
    .Remote()
    .StartAsync();

context = system.Root;
PID. (see below)
Overview of Client Actor
client = context.Spawn(
    Props.FromFunc(
        ctx => {
            switch (ctx.Message)
            {
                case Connected connected:
                    Console.WriteLine(connected.Message);
                    break;
                case SayResponse sayResponse:
                    Console.WriteLine($"{sayResponse.UserName} {sayResponse.Message}");
                    break;
                case NickResponse nickResponse:
                    Console.WriteLine($"{nickResponse.OldUserName} is now {nickResponse.NewUserName}");
                    break;
            }

            return Task.CompletedTask;
        }
    )
);
Now let’s take a look at how we can resolve the server PID and establish a connection to it.
Resolving Server PID
Resolving server PID is as easy as calling FromAddress factory method on PID class supplying it with the combination of host:port and the name/id of the server actor we spawned earlier.
server = PID.FromAddress("127.0.0.1:8000", "chatserver");
PID, we are able to transparently send messages back and forth via our local actor system.
Connecting to Server
As per our previously established protobuf contract, we initiate a connection to the server by sending the initial Connect message which contains the PID of our client actor, which will subsequently be used by the server actor to respond to us thus establishing a two-way connection.
context.Send(
    server,
    new Connect
    {
        Sender = client
    }
);
Parsing and Sending Command Messages
var nick = "Alex";

while (true)
{
    var text = Console.ReadLine();

    if (string.IsNullOrWhiteSpace(text))
        continue;

    if (text.Equals("/exit"))
        return;

    if (text.StartsWith("/nick "))
    {
        var t = text.Split(' ')[1];

        context.Send(
            server,
            new NickRequest
            {
                OldUserName = nick,
                NewUserName = t
            }
        );

        nick = t;

        continue;
    }

    context.Send(
        server,
        new SayRequest
        {
            UserName = nick,
            Message = text
        }
    );
}
This is the main loop of the client program in which we listen for user input from the command line and try to make sense of it (parse it).
We basically have only a few cases here:
First, we simply ignore hitting the return key by doing nothing.
Next, we check if the user has entered an exit command. If that’s the case, we return from our main loop which in turn ends our program and shuts down the actor system.
If the user tries to change the default nick by using /nick command, we parse the new nick, pack it inside of NickRequest message and send it over to the server via our root context. Notice how we transparently send the message here by only providing the server PID and the message it self is then automatically routed to the correct actor by Proto.Remote.
At last, if the user types in some unstructured text we it is a chat message pass it along as such to the server via SayRequest message. Remember that we wired up our client actor to receive messages from the server and print them out to the console.
Go Example
As stated before, client and server might as well be built using different languages and interact with each other just as well. In fact, there is the same chat example written in Go hosted here.
This brings us to the end of the tour of our chat example. Hope you enjoyed it.